![]()
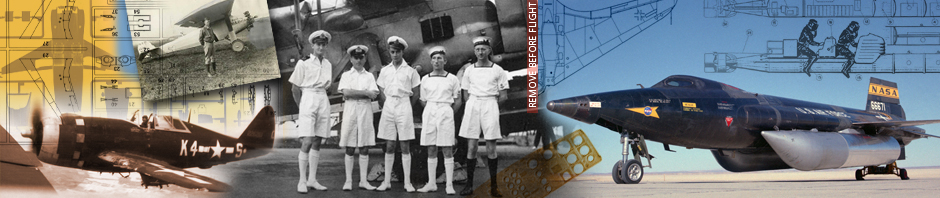
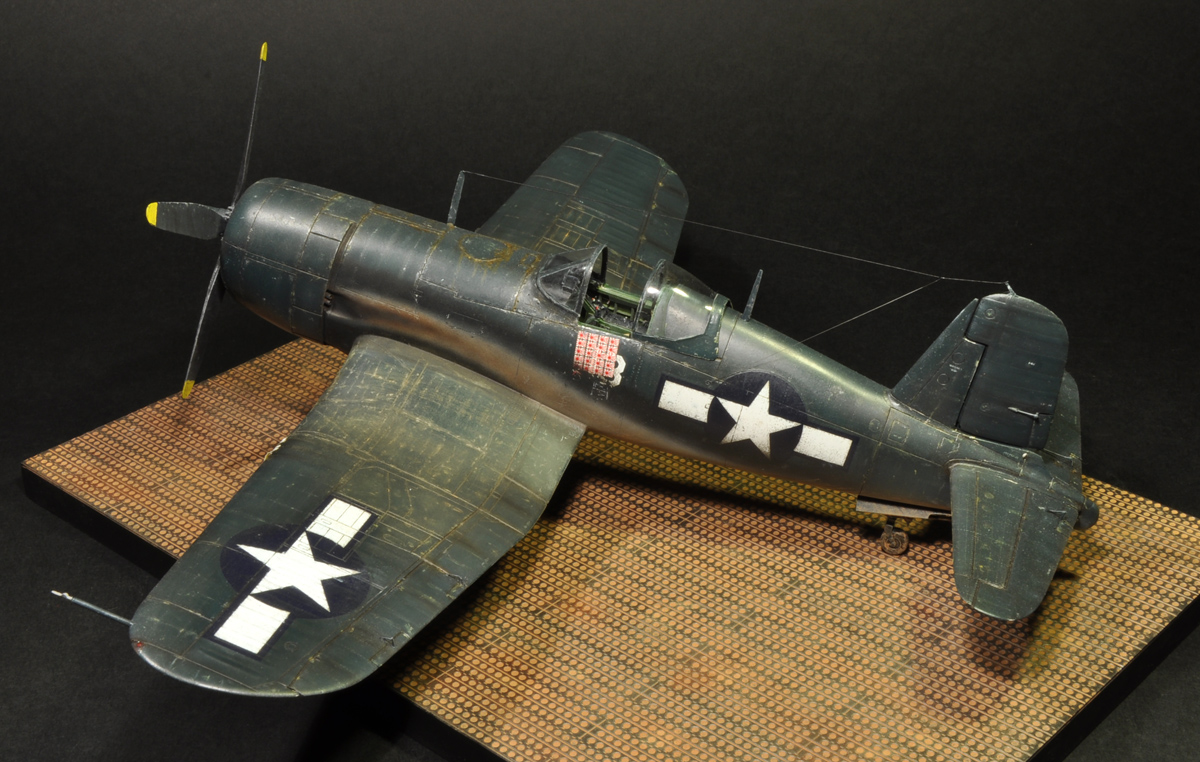
F4U-4 Corsair I.
by Juraj Bojkovský


I. Introduction
Juraj sent me the photos of his finished U-4 by ACADEMY. He started building perhaps only because this is the only 1/48 kit of a Corsair in this version. His options were to either build a conversion of another kit (not an U-4) i.e. the Hasegawa F4U-7, or to begin rebuilding the original U-4 by ACADEMY – what at first sight looked like a better solution. After finishing the kit however, he told me that he’s not sure that he had taken the easier way at all.
After seeing all the necessary alterations you can form your own opinion on which way is worth trying should you want a 1/48 F4U-4.

II. Kit Alterations and Improvements:
- Repair of the upper fuselage area and the related rudder geometry adjustment, namely its deviation from the fuselage axis
- Cockpit and pilot seat scratchbuild
- Leading edge air intakes scratchbuild
- Exhaust exit adjustment and addition of own metal exhausts
- Undercarriage adjustment
- Adjustment to the rudder and elevator moving surfaces – an imitation of ports and a canvas coating
- A custom-made acetate canopy
- Adjustments to the inner cowling surface
- Engine adjustments
- Manufacture of the position lights and wing lights
- Trim control cables manufacture
- Surface riveting

Accessories used:
- A QUICKBOOST engine
- A QUICKBOOST gunsight
- EDUARD seatbelts
- Wheels from the F4U-1D ACADEMY kit
- Undercarriage covers from the F4U-7 HASEGAWA kit

III. The Kit Assembly
One of the most visible inaccuracies of the kit is the fuselage shape, especially in the area behind the cockpit. The fuselage is visibly thicker, which can be seen well on the fuselage top. The canopy is also adjusted according to this obese fuselage. This shortcoming can be remedied by thinning the fuselage (by taking some material away from the place where the fuselage halves meet) roughly from where the engine firewall sits up to the rudder as well as by changing the canopy.
Here you can see the fuselage after altering its shape, with the rudder removed:

Juraj removed the rudder and glued it onto the assembled fuselage later, in the angle which corresponds with the real airplane, i.e. 2 degrees away from the lengthwise fuselage axis. Here we can see the rudder already in its place with the mentioned angle deviation:

And after filling:

Creating the air intake openings in the leading edge was not an easy task. The kit manufacturer did major simplifications to this area – the filter grills are the only usable original parts. The whole air intake canal and its dividers need to be built from scratch. The next two photos show this difficult process:

Filling and sanding inside the wing intakes was one of the most frustrating tasks.

Also the exhaust have undergone alterations – here you can see the engine exhaust exit adjusted for inserting hollow metal tubes:

When mentioning the engine, let me show you this photo of a beautiful cast of a QUICKBOOST engine after it has been tinkered with:

A photo of a very nicely patinated engine:

The front part of the cowling does not have an inside wall, so it has to be manufactured:


ACADEMY offers a minimalistic cockpit which has to be altered either by custom changes or ready uprade sets. Juraj chose, apart from the QUICKBOOST gunsight, to build everything from scratch. When it comes to the pilot seat, the F4U-4 did not have the standard seat, but rather some kind of blocky “basin” with an armor plate as the backrest. Here follows a sequence of several photos documenting the birth of a new cockpit:


This is how the cockpit looked like before being painted.

After painting and patining:

Inner cockpit walls are made:


The rudder pedals:

Here we can see the cockpit already assembled and placed into the fuselage:


After thinning the fuselage, building a new (thinner) canopy was necessary. On these photos you can see the plaster mold made by cutting the original cover in half and thinning it right after.

The new acetate canopy framed by KABUKI tape.

The finished canopy:

The cockpit tub along with the engine were put to their places in the fuselage, and after gluing the assembled wings in place and cementing the bonds the time came to adjust the surface: riveting, and adjustments to those areas which were coated with canvas in reality, to lighten up the aircraft. Although the kit manufacturer indicated this surface on the wings, elevators and the rudder, it seemed quite inaccurate.

On the wings there was only sanding of the sharp port edges, which looked very differently when compared to the real aircraft. On the tail moving surfaces Juraj tried a few small experiments imitating the canvas surface. First he completely ground off the port indications and tried to replace them with aluminum foil strips. He glued these on using film glue, then he began alternately coating them with Surfacer and gently sanding them. The aluminum foil was a bit thick however, so a lot of sanding was needed, which resulted in the foil ripping from time to time.

In the end he decided to use a different material – the KABUKI tape. It’s thinner, and one of its key advantages is its stickiness. Thus it’s very easy to create the whole structure. After coating in film glue the tape adheres very well to the surface. Further procedure is the same – the ports are repeatedly sanded and coated with Surfacer. After the third coat dried, gently sanding and polishing made the impression of ribs coated with fabric.

Further small alterations which enrich this otherwise non-detailed kit are for example position lights, the pitot tube, trim cables, antennas, and an upgraded undercarriage. Especially the wheels badly need replacement.

The position lights and the Pitot tube:


The undercarriage upgrades:

IV. Patina, Wear and Tear
Because Juraj likes heavily weathered aircraft and no fresh or museum-like surfaces, his Corsair looks just like that. A weathered machine somewhere on a muddy air force airfield. He used a black-colored pre-shading on a surfacer-flattened surface, then he applied an even coat of blue camouflage paint, and finally the patina: first some spots and lines using lighter and darker shades mixed from the blue camouflage color, dimmed by very thin integrating blue overcoat film,

then decals were applied, after which fading was done using several shades of lighter oil-based colors. The final dirt wash by oil colors came at last.


Some of the rivet lines are filled with aluminum, scratches are made using zinchromat, aluminum and on some places also light gray color.

Oil and fuel stains are again made using oil-based colors, dust and mud using pigment.

The exhaust fume stains were, according to Juraj, “a great fight”, and were made only after the third attempt.

V. Conclusion
In Juraj’s words this was a test kit (he still views it as one), on which he wanted to try different building and weathering procedures for the first time. Especially the patina on this kit was made by trial-and-error repeatedly… :O)
After the successful port experiment, he thinks that unless a proper F4U-4 kit will be made by one of the kit manufacturers, it will be much simpler to alter the Hasegawa F4U-7 kit. The biggest difference is the all-metal wing, which he does not see as a problem today; and the longer fuselage front section (from wing) that needs to be shortened. As we saw above, the ACADEMY kit can’t be built without cutting either, and what’s more, it has quite a few inaccuracies and (especially today) too few details.
I think you’ll have to agree when I say that for a test kit it turned out very well. If only all our experiments ended like this!
You can find further finished kits in the Built Kits category.
Kitl, photos Copyright © 2011 by Juraj Bojkovský.
Hi, i have reading out and i will definitely bookmarrk your site, just wanted to say i liked this article.
yeah indeed its amazing .