![]()
This is the fourth – and probably the final part of the series dedicated to the Pilatus PC-6 bird details. Nearly everything was told and shown within the previous parts. I have selected some more interesting details though. These shots cover such areas as the doors, undercarriage, wings, aerials etc. Hopefully you will like it!

1/ Doors
We can begin with the doors. Let us start on the right-hand (starboard) side – walking towards the engine compartment.

Here is the slide door in its rearmost position (upper and lower pictures). Please do not miss the small (partly oval) door just behind the slide one.

The door’s rail arrangement can be clearly seen on the lower close-up. Also note the heavily riveted fuselage surface top.


The small circular side window can be seen through the opened rear door (upper picture).
Details of the inner side of the (opened) front door on the same side of the plane (lower picture).

Now let’s visit the left-hand (port) side of the plane.

This front (pilot’s) door is nearly identical with the one on the opposite side. There can be found two well-visible differences though. The front door has a small (probably vent window) inset. On the contrary – the inset gauge (thermometer maybe) is missing here. Please also note the rear-view mirror fitted onto the wing strut (near the right edge of the upper picture). Some other Pilatuses photographed at the same Air Base did not have the mirrors fitted by the way.

The rear door on this side is completely different – not a sliding one, but rather a double-wing door (as shown below). Please note the heavily riveted fuselage again.

The small circular side window can be seen on this side too.

2/ Undercarriage
Main undercarriage
I would like to document the main undercarriage first. You will find the tail wheel just below it.

This is the place where the right-hand (starboard) side undercarriage strut is attached to the fuselage side by this kind of hinge (upper picture). Please note the fuselage reinforcement plates here. Also note the two different kinds of the boarding footsteps placed on the undercarriage.

Here is the left-hand (port) side undercarriage strut uppermost end (picture above). Do not miss the door hinge and the vent window too.

The same place but the camera is looking toward the wheel. The boarding steps are shown “in action” here: 😀


You can see the left main wheel outer side (upper picture).
Also the wing strut lower (fuselage) fitting can be clearly seen here – in the upper right portion of the picture above. You can find more details of this connection point browsing the following two pictures:


And now back to the undercarriage shots…

This is the right-hand (starboard) side main undercarriage as seen from behind (upper picture).

The main undercarriage photographed off the left-hand (port) side (upper and lower pictures). The camera is looking a bit toward the nose.

Now we can look at the inner side of the main wheels.

The Starboard side wheel inner side (upper picture).
The same wheel but a closer look (lower one).

The following two pictures shows the left-hand (port) side wheel. Please note the brakes and hydraulic tubes. The camera is looking downwards and toward the nose section.

The lower picture was shot closer to the wheel.

Now let’s go under the plane to see how the undercarriage is attached to the fuselage bottom. Three following pictures were all shot from the left-hand (port) side.

This is the front end (upper picture)…
… and the rear end (lower picture) of the landing gear legs as connected to the fuselage bottom.

And this is the center section as a whole (picture below). Please do not miss the way the hydraulic tubes are attached.

And the very last look at the undercarriage – now the photographer kneels just below the nose. The camera is looking slightly upwards and toward the tail (lower picture). Please note the large fin aerial placed in front of the photographer.

Tail undercarriage
The tail undercarriage has been fairly well-documented already – in one of my previous articles about the Pilatus Porter. It can be found in the Pilatus Porter PC-6 details Pt. I. article in the section c/ Tail wheel. The following pictures are very similar but not the same – so I decided to place them here. You can compare the differences among the planes depicted in the aforementioned article – for instance the colors of the particular parts.


Here you can see two more close-ups of the tail undercarriage – photographed by Juraj Bojkovsky:


3/ Wing Details
We can start at the wing outer end. Child visitors were playing with the control stick, so we can see the aileron in two different positions here (following two pics):

While here the right-hand (starboard) side wing aileron is shown (on upper picture)…
… this is the opposite wing’s one (picture below):

The long thin rod protruding toward the leading edge might be the aileron counter weight. Please note the landing light too (near the left edge of the picture above).
Here is a close-up of the landing light (please do not miss the small red hook close to the lamp):


This shot depicts the right-hand (starboard) side wing trim tab with the actuator (upper picture). The camera is looking toward the wing tip.
The left-hand (port) side wing trim tab with the actuator now shown as looking toward the fuselage (lower picture).


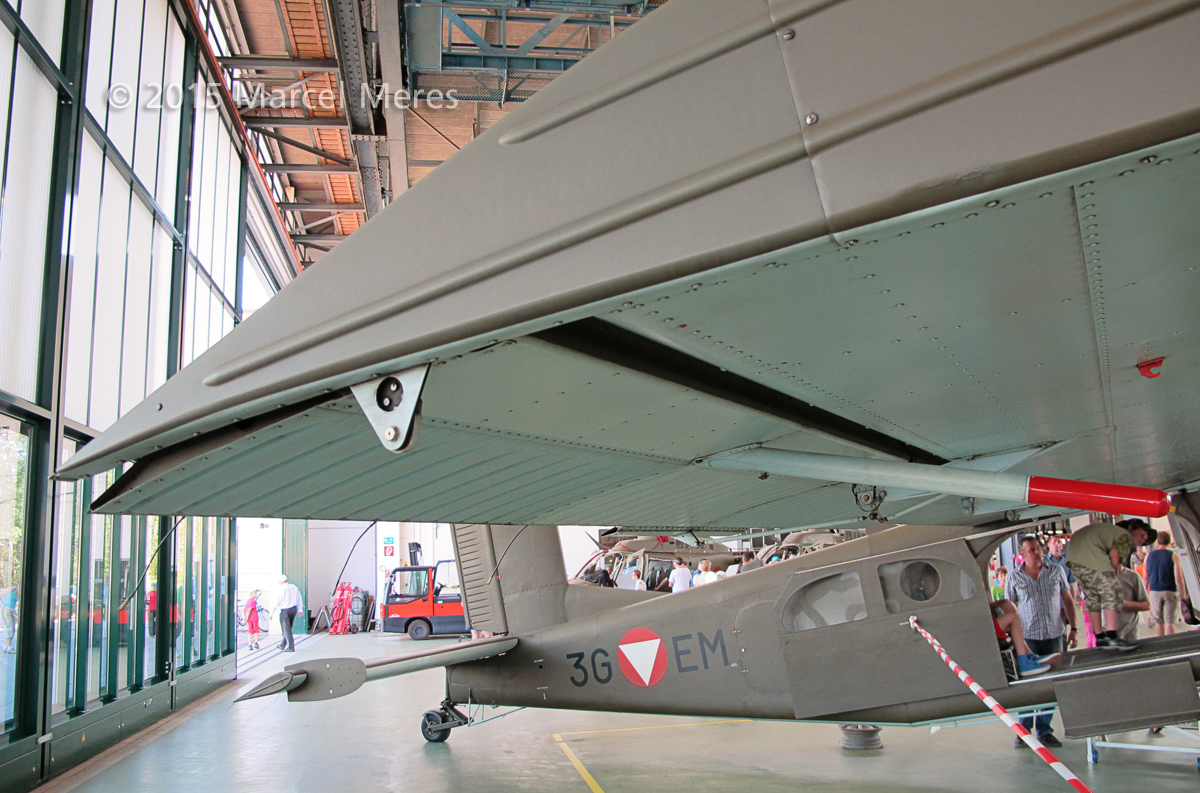
Here you can see the underside of the wing – the section between the fuselage and the wing strut (upper and lower pictures).

The Pitot tube is shown here too. A closer look at the Pitot tube and the flap hinge is can be seen below:

This shot depicts the same left-hand (port) side wing flap at a different angle – to better see the gap between wing and a flap (three following pictures):


Here is the place where the wing strut is connected to the left-hand (port) side wing. The wing tip is to the right (upper picture).
We can move closer to see more details…

Here you are!

The same point but the camera is placed to look up and toward the fuselage (upper picture).
The wing pylon attachment point can be seen here (following two pictures):


Note: You can also see the wing pylon attached to this point – if you wish. It was photographed with the drop tank fitted. Please visit this article to see more.

And finally one shot showing us how (or where) the wings meet the fuselage and windscreen. Please also see the windshield shape and its framing design.
4/ Tail planes
The empennage was documented thoroughly in my first post dedicated to the PC-6 plane. I decided to append two more valuable pictures though.
First picture is showing at least one interesting detail – a small rectangular plate covering a gap between the tail-to-stabilizer fairing and the horizontal stabilizer itself (in the middle of the picture below).

In the second picture you can see the outer end of the horizontal stabilizer. Nose of the airplane is to the right. As we see, the outer part of the elevator continues protruding outwards – behind the fenced edge of the stabilizer (lower left portion of the picture below).

5/ Aerials & Surface details
Lower surfaces
Firstly I would like to show you all the details placed under the nose (engine) section. Please note: The propeller and the frontmost part of the airplane’s nose were disassembled while being photographed.
On the following pics the camera will move from the nose (which is on the left) to airplane’s tail section:


Now the same section but shot off the propeller towards the airplane’s tail:


Camera moved deeper backwards, looking up…


This is the other place where nearly every modeler can find many goodies to detail his (or her) model kit – the Pilatus’ back. Let us see what we have here…

The camera is placed on the left-hand (port) side looking across the airplane’s back towards the nose and right-hand (starboard) wing end (upper picture).
Now the camera is looking above the plane’s back directly towards the nose (lower picture).


These are the aerials placed in front of the vertical stabilizer (upper picture). You can compare this area of this particular Pilatus with the one depicted here. You would find differences here too.
Neither aerials nor other details must be the same. To my surprise this plane had the rear-view mirror attached to its left-hand (port) side wing strut.

The rear-view mirror photographed from behind the wing strut – the camera is looking towards the nose (upper picture).
Now a more closer look – the camera is looking towards the pilot’s seat (lower picture).

That is all regarding the Pilatus Porter that we (me and J. Bojkovsky) can share with you. I have chosen the best photographs from our common visit to Brumowski Air Base in Austria. Hopefully this material will be helpful to you. Keep modelling folks!
For more references concerning this nice airplane, please also see the previous Pilatus Porter PC-6 details Pt. I., Pt. II. and Pt. III.
If you enjoyed this post, I’d be very grateful if you’d help it spread by sharing it on Facebook.
Text Copyright © 2015 by Marcel Meres
Images Copyright © 2015 by Marcel Meres & Juraj Bojkovsky