
Folland Gnat T.1
by Marcel Meres

1. Introductory Notes
First, why the AIRFIX Folland Gnat? It was something like … how could I say it? CURIOSITY! Seeing its very nice boxart, even with a small Cartograph logo on it, made me look inside of the kit. Precisely molded styrene parts with many interesting details is what I found. Combination of what I saw with surprisingly low cost led to my “must have” feeling. I simply wanted to try a quick and easy build with no extra accessories, no complications – just nearly straight out of the box. I write nearly – because fully can somehow never be kept 😀 .

2. Construction
If you consider its cost, the oververall quality of the kit is surprisingly good, I’d say. Nearly all parts came together well. Only a minimum of overall sanding and filling was needed. The only minor issue I noticed was with the main undercarriage doors installation. It was due to a slight inaccuracy of the connecting surfaces. Removing thin stripes of material solved the problem in a minute. This kit belongs into skill level No1 and I fully agree with it being suitable for kids.

3. Improvements made
As was written I intended not to use any aftermarket resin or photoetched parts for this build. Small selfmade upgrades were allowed though. I simply wanted to change some details I cannot live with – to add the missing position lights and to add at least some of the interior details.
Position lights
The wing tips with no position lights looked quite odd to me. I decided to cut out gaps for the lights – according to photographs and existing panelling lines. Then both the “dents” were filled using a 2-component transparent adhesive (or 5 minutes epoxy). Finally the lamps were coated with TAMIYA transparent tints using a tiny brush.
Note: This is a good way how to make small “lamps” quick and easy. You will probably not want to use it with larger scales where the filled gap is significantly larger too. Inset and polished transparent styrene would be better there.
Pitot Tube
Pitot tube from the kit looked somehow thick and overall unrealistic. Nothing for the real gnat at all! 😀 A brand new tube was made using thin hypodermic needles. Here is how: The base of the Pitot tube was cut off from the rest of its length. A small hole was drilled into this base then. Then, a short and tiny steel wire was glued into the hole to better keep the rest of the tube in place. Finally everything was glued together with an adjustable or “slow” cyanoacrylate adhesive. Here is a drawing showing the process:

Cockpit
The Gnats interior was made directly as it comes with the kit plus my addition of the pilot harness onto the pilot seats. The harnesses were made of thin and soft metal sheets and cigarette papers according to photo reference. Own yellow and black jettison handles made of thin wire were added too.
Note: Please keep in mind – If you make the canopy glass closed, nearly nothing will be seen inside. And by the way: AIRFIX Folland kit in this (1:72) scale has only one option for the canopy which is CLOSED.

4. Colors and Painting
Choosing the livery
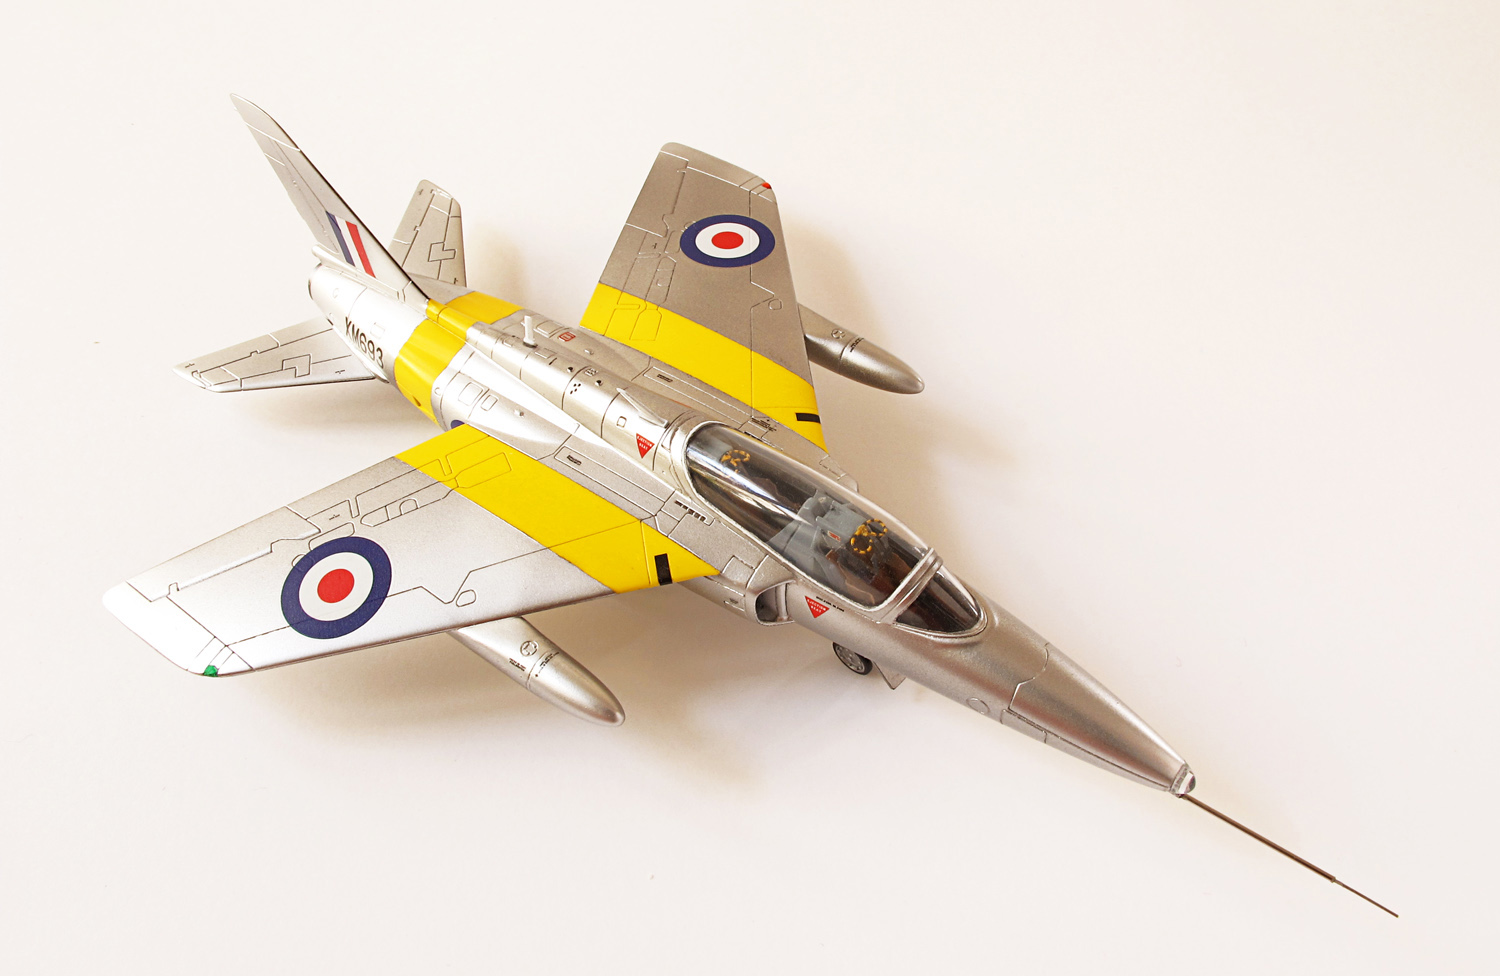
Model comes with the classic and notorious silver plus red color training scheme. I wanted to try out something different and less colourful. Many other liveries can by found using Google: from the so-called yellow jackets through various Red Arrows variants to private crazy camouflaged ones – so many it’s hard to choose one.
Finally I found the photographs of a former RAF bird now in possession of a private owner which was definitely my cup of tea. A silver plane with older type of “T” scheme sporting the yellow bars. Airplane is painted similarly to the older machine with the same code – probably the prototype with shorter nose and sans the black antiglare panel. Also the aerials differ slightly from those on RAF birds.

Photographs from airshows and exhibitions show this plane obviously well serviced and clean. All the surfaces look like alluminium laquer with a high sheen. Frankly it looks so new I hadn’t the guts to make it weathered in any way (what I like so much).
The color finish started with the yellow stripes. They are the Mr. Color 4 Gloss Yellow sprayed onto the Mr. Color 156 Gloss Super White. The same white was used onto a thin canopy framing line and inside surfaces of both air intakes too.

After masking out the yellow bars and canopy the metal finish came in play. The Alclad 2 Polished Aluminium ALC-105 was airbrushed onto the gloss coat of Mr. Color 2 Gloss Black. Newly – and surprisingly to me – the Alclad 2 laquers need to be sealed. They may come off otherwise. And indeed they came off, mostly on edges. The Alclad 2 Aqua Gloss ALC 600 was used as the sealer. Applying this finishing coat in several light layers resulted in a high gloss surface – although with no such true metallic look as the bare Polished Aluminium had.

5. Decals
The British national insignia and stenciling were used as included in the boxing. The code letters were drawn using Adobe Illustrator according to the photographs and was printed onto transparent decal paper then. Black and white home laser printer was used.

6. The Pros and Cons of the Kit (as I see it)
Pros:
- Precisely injected parts (minimum of sanding and filling needed), no molding flash, minimum of sink marks – thus absolutely no problem with a metal finish.
- Comprehensible instructions + simplicity of building.
- Relatively high overall quality / surprisigly low price.
- Decal sheet with perfect register.
Cons:
- Some of the parts too thick i.e. out of scale – the Pitot tube and partly the undercarriage covers, mainly the front one.
- Absence of wing position lights.
- Overpronounced panel lines for some modelers.
- Decals not as soft as you probably wish them to be.
 7. Conclusion

I was told that newly made AIRFIX kits – those made using their new tooling – are much better than the older ones. This kit has a lot of nice surface details and comparing it to the photographs it looks like the real thing. I have made no measurements and used no tools or scale drawings for precise judging though. It was built for fun and it fully satisfied me in this sense.

8. My special thanks to:
- Mr. Jozef Frastia – who taught me how to make the small position lights using the drop of glue.
- Alclad 2 people – who advise me with the proper sealant for their metal laquers.
For more finished model-kits please see the Built Kits category. If you enjoyed this post, I’d be very grateful if you’d help it spread by sharing it on Facebook.
Model, Images and Text Copyright © 2016 by Marcel Meres.